Security: Authentication and Privacy
Needless to say, for many applications security is a make-or-break concern. In Catch-Phrase it comes down to only allowing authorized people to access the system, and protecting data privacy by encrypting all packets flowing over public networks.
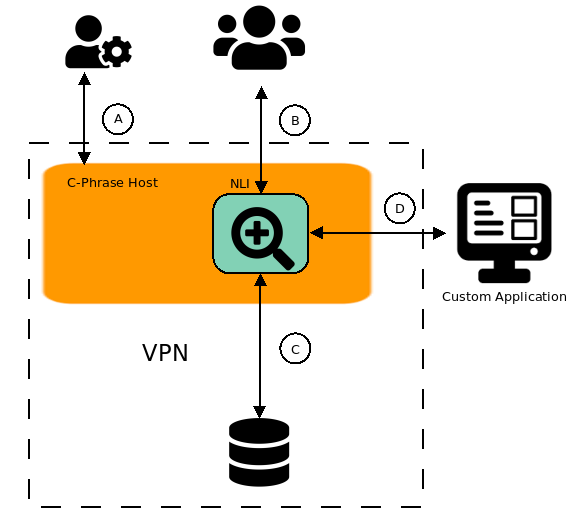
The above diagram shows the four main channels that need to be secured: A.) Administrator access to the Catch-Phrase Server via Admin Interface and SSH; B.) User Access to running NLIs; C.) Catch-Phrase access to remote databases; D.) REST API calls from custom applications.
For channels A, B and D we assume that your Catch-Phrase Host has secure SSH access.
The Admin Interface and individual NLIs are protected by a single
user/password pair that is set in the corresponding config.json file.
However since these are accessed via public browsers, packets flowing between browsers to the Catch-Phrase host will
need to be encrypted. This you will need to configure Catch-Phrase for HTTPS-based access.
Finally we assume that the host that runs the database
in on your VPN. This makes securing channel D much easier.
Setting up HTTPS access to a Catch-Phrase EC2
Here we outline the process of securing an EC2 instance for HTTPS access on AWS. A similar set of operations will be necessary to secure a VM on another cloud prodiver or to secure an on-premises machine.Setting up HTTPS access to Catch-Phrase involves the following steps:
- Step 0. Open HTTP and HTTPS ingres for your EC2
- Step 1. Map a registered subdomain to your EC2
- Step 2. Install Let's Encrypt certificates on your EC2
- Step 3. Reconfigure the webserver on your EC2
- Step 4. Setting proxies ports for your NLIs
- Step 5. Clean up
Step 0. Open up HTTP and HTTPS ingress on your EC2
After launching your EC2, go the default security group and add HTTP and HTTPS ingres on the standard ports. Note that this should be on by default, but it is a good idea to confirm this.
Step 1. Map a registered subdomain to your EC2
After launching your EC2, go to your DNS configuration and create an alias record for a subdomain that points to
the IP of your EC2. Note that if you contact us, we can set this up as a subdomain off of our domain c-phrase.link.
Test this by opening an incognito browser to http://sub-domain.domain. This should show you the defult NGINX start screen.
Step 2. Installing Certificates from Let's Encrypt
Now SSH into your Catch-Phrase Server.
ssh -i your-pem-file.pem admin@sub-domain.domain
Once in, issue the following commands:
sudo certbot --nginx -d your-sub-domain
This will take you through a series of questions to obtain a certificate so that you can use HTTPS. Now finish up with:
sudo certbot renew --dry-run
sudo service nginx restart
Now test your secure connection via accessing https://sub-domain.domain from a browser window.
This time you should not need to be incognito. You should see the
lock symbol in your browser indicating that the connection is secure and all packes are being encrypted.
Step 3. Reconfiguring the webserver on your EC2
You will now set up what is called a 'reverse proxy' in your NGINX configuration. The idea is that users will use HTTPS to point their browsers to a specific proxy port on the Catch-Phrase Server. The NGINX server listens at this proxy port, decrypts traffic and sends it to a local port which is NOT open for regular HTTP access. We provide a default configuration which maps proxies 8000-8006 to ports 9000-9006 respectively and that maps port 443 to the port 9999 where your Admin Server should be listening. SSH into your host and execute the following commands:
cd /etc/nginx/sites-available/
sudo cp default default.backup
sudo cp https.default default
sudo vim default
Now in here do a global replace of DOMAIN with sub-domain.domain
After this edit, confirm that the NGINX configuration is acceptable, kill any Catch-Phrase NLIs that may occupy critical ports, restart the NGINX server, and restart Catch-Phrase Admin with:
sudo nginx -t
sudo Catch-Phrase-kill-all
sudo service nginx restart
cd
./restart.sh
Assuming that you have a Catch-Phrase Admin Server listening on port 9999,
if you point your browser at https://sub-domain.domain you should be brought into the Admin Interface
Step 4. Setting ports and proxies ports for your NLIs
You will need now to run your NLIs on ports in the range 9000-9006 and set their proxies in the port range of 8000-8006.
You may achieve this via changing the
config.json file
for an NLI. For the PIM example above this could be:
{...
  "run": {
    "port": 9002,
    "proxy": 8002
  },...}
Step 5. Clean up
Once access to Admin Server is only via https, then
an administrator should change usernames and passwords so that they are required for
access. Channels A and B above thus are secure.
You should also not forget to close ingress on port 9999 on your EC2.